Orienteering Technique for Beginners
QOC offers (free) beginner instruction at all of our public events; just ask for it at the registration table. We do not regularly offer "classroom instruction", because we strongly believe that having instruction at an event and then being able to immediately practice what you've learned is the most effective way to both learn - and have fun - orienteering.
As you learn to orienteer, an initial period of rapid improvement is almost inevitable. However, there are some potential pitfalls and this initial period is when you'll either establish good habits that will serve you well on intermediate and advanced courses or less good ones that will cause you frustration further down the road. Some technical tips to make your first orienteering experience (and hopefully subsequent ones as well) a success follow. For a broader description of what to expect at your first QOC event, check out Your First Event.
- The goal in a standard orienteering course is to find all of a set of numbered controls, in ascending numerical order, as quickly as possible. Be careful not to skip controls or take them out of order or in reverse order. The challenge in orienteering is to pick and then successfully execute the best route between controls for YOU, which may not be the same as the best route for someone else with different skills, experience level and/or physical ability. It is particularly important to note that the best route is rarely to simply follow a compass bearing in a straight line between controls.
- A control is a orange and white bag (some also have a blue stripe). Each control has a unique control code. The control codes for your course will be given in the control description sheet (aka clue sheet) printed on the map. Always remember to check the code when you find a control, to verify that it is the one you're looking for.
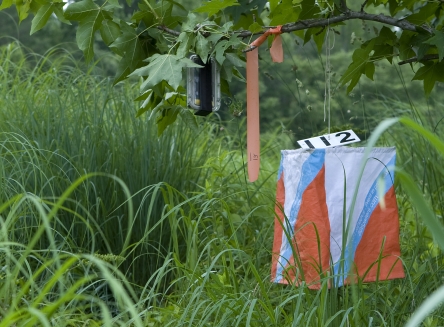
- Each control is hung with equipment for recording that you found it, either electronically on a small 'stick' that you insert into the equipment or mechanically using a pin punch on a paper control card or on your map. Electronic punching is the norm at QOC events. Should the electronic punching equipment at a control fail to beep and flash when you try to punch, simply use the backup mechanical pin punch attached to the control on your map to record proof that you visited the control.
- The two permitted aids to navigation in orienteering are the map and a compass. Of these two, the map is primary and the compass is secondary, even optional, particularly for beginner courses. The most crucial skill to develop is therefore map reading. Compass technique is much less important, though a compass can be helpful and it will be beneficial to start forming good habits if using one. Some discussion of map reading technique, compass technique and one other important technique seem in order.
MAP READING - the main thing as a beginner is to learn to understand the map symbols. Orienteering maps are made specifically for the sport, to standards unlike those of any other maps, even topographic maps, with which you're likely to be familiar.
- COLORS:
white = normal forest (different from USGS maps, where white = fields)
green = thicker forest and undergrowth, darker greens mean thicker vegetation/slower running/lower visibility.
yellow = fields, open areas
blue = water features: streams, marshes, ponds and lakes
black = man-made features such as buildings, fences, abandoned cars, roads, tracks, trails, etc. and also rock features such as cliffs and boulders
brown = earth features, mainly contour lines (lines following constant elevation) but also gullies, ditches, pits, small depressions, earth banks and walls. In interpreting contour lines, remember that lines will be close together to indicate steep terrain, farther apart for flatter areas. It can be difficult to tell uphill from downhill on the map - keep in mind that water features generally occur at the bottom of slopes, that closed loops of contours usually denote hills rather than depressions and that spurs tend to be more rounded in shape compared to reentrants (small valleys or "draws" to non-orienteers) which tend to be sharper - V-shaped rather than U-shaped.
There may be a legend printed on the map showing all the various symbols. If not, there may be one available at registration or near the start for you to study. A legend showing most of the standard orienteering map symbols can also be seen here.
- SCALE:
1:10,000 and 1:15,000 are the most common scales for orienteering maps. On a 1:10,000 map, a centimeter on the map will correspond to 100 meters in the terrain. At 1:15,000, 1 cm on the map equals 150 meters in the terrain. 1;7,500 is a less common scale. 1:5,000 is typical for sprints.
Beginner courses, since they usually cover a fair bit less terrain than longer courses, may be printed at a more enlarged scale than other courses in order to make it easier for beginners to read the map. The map scale for the various courses should be in the meet notes and also printed on the map. The map should also have the scale printed on it.
- CONTOUR INTERVAL
Adjacent contour lines will normally be separated by a 5 meter difference in elevation. On some maps, other contour intervals are used, with 2.5 meters being most commonly used in flatter terrain. The contour interval should be printed on the map. Note that the contour interval is between solid brown contour lines. Dashed brown lines called formlines may be used to indicate topographic details between solid contour lines.
- MAGNETIC NORTH LINES
The map will be covered with evenly though fairly widely spaced lines indicating magnetic north - the north ends of the lines will have arrowheads and/or a letter N or there will be a compass rose on the map indicating which end of the lines is north. In addition to being useful for staying oriented, the even spacing of these lines - by convention, 250 meters apart on 1:10,000 maps and 500 meters apart on 1:15,000 maps but actual maps may vary so look for a scale bar somewhere on the map showing how far apart two adjacent lines are - makes it easy to estimate distances on the map at a glance.
COMPASS TECHNIQUE - reiterating, in orienteering, the map is primary, the compass is secondary. On a beginner level course, you shouldn't need to use the compass to find the controls. However, the compass is useful for keeping the map oriented, which is very helpful in keeping yourself oriented. To explain:
- the map is a miniature representation of the terrain. It is easiest to interpret and to relate to the terrain if held so that directions between features on the map are the same as directions between the same features in the terrain. This saves you the effort of performing a mental rotation of directions in the terrain to directions on the map and vice versa.
- the map can be kept oriented without a compass by comparing it to the terrain and rotating it as necessary to make it match the terrain. Once this is done, it takes little effort to keep the map oriented relative to whatever features you encounter as you move around in the terrain. It can be helpful to think of the map as being fixed in spatial orientation with your body moving around the map as you find convenient, i.e. if heading north, you'd stand on the south side of the map facing north; if heading east, you'd stand on the west side of the map facing east, etc.
- the map can also be oriented using the compass. The map has magnetic north lines drawn across it. It suffices to hold the map so that the north end of these lines is pointing in the same direction as the north pointing, generally more colorful, end of the needle of your compass, when the latter is held flat for a second or two. This is particularly useful when there are no features in view with a clear directionality to them - not a situation very likely to arise on a beginner course but much more common on more advanced courses so this is a useful skill for the future, as well as being immediately useful, if done consistently, in cluing you in if you make a map reading error and accidentally start, for example, following a trail heading off in a different direction than the trail you intended.
- Note that it is very easy if relying on the compass to orient the map to get things exactly wrong by lining the compass needle up with the south end of the magnetic north lines. Make sure you know which end is north on both the compass needle and the map before relying on compass technique to take you in the right direction.
THUMBING - this is a very simple but powerful technique that makes it easier to keep track of your location and read the necessary information on the map. Just fold the map somewhat to the side of the route from your current location to you next control and hold it in your hand so that your thumb is pointing to your current location. Then, as you move along, move your thumb every time you reach a feature in the terrain marked on the map so that your thumb always points to your most recent known location. Your thumb therefore becomes the equivalent of a You Are Here marker on the map. This makes it easy to zero in on the relevant part of the map each time you glance at it, so you can read the details you need to navigate by without wasting time scanning other parts of the map. Combined with keeping the map oriented, this makes the job of reading the map as easy as possible so more of your attention can be devoted to the terrain around you.
That should be more than enough to try to keep in mind on your first course. Enjoy!
P.S. For a similar discussion of orienteering technique for beginners in words that may resonate more for you and with visual aids (to be added here in the fullness of time), this would be a fine place to go.
ShareThis